fastdfs 多服务器 配置

fastdfs是一个轻量级的文件系统,现在生产环境用的就是这个。个人觉得还是不错的文件系统。现在文件服务器是一台机子,现在我又加了一台。下面详细介绍一下配置过程。
一,服务器介绍
192.168.1.131 web服务器
192.168.1.130 已有文件服务器
192.168.1.106 新增的文件服务器
服务器架构的时候,我把web服务器和文件服务器分开了。
二,fastdfs安装配置
wget http://fastdfs.googlecode.com/files/FastDFS_v1.22.tar.gz
 tar zxf FastDFS_v1.22.tar.gz
 cd FastDFS
 ./make.sh
 mkdir /usr/local/include             //一般情况下,local下面会有一个include文件夹的,如果没有在建个目录
 ./make.sh install
三,192.168.1.106新增服务文件服务器配置
1,tracker.conf配置
[root@localhost fastdfs]# cat /home/zhangy/fastdfs/tracker.conf |awk '{if($0 !~ /^$/ && $0 !~ /^#/) {print $0}}'
disabled=false
bind_addr=
port=22122
network_timeout=60
base_path=/var/www/fastdfs
max_connections=32
store_lookup=2
store_group=group1
store_server=0
store_path=0
download_server=0
reserved_storage_space = 1GB
log_level=info
run_by_group=
run_by_user=
allow_hosts=*
sync_log_buff_interval = 10
check_active_interval = 120
thread_stack_size=1MB
http.disabled=false
http.server_port=80
2,storage.conf配置
[root@localhost fastdfs]# cat /home/zhangy/fastdfs/storage.conf |awk '{if($0 !~ /^$/ && $0 !~ /^#/) {print $0}}'
disabled=false
group_name=group1
bind_addr=
port=23000
network_timeout=60
heart_beat_interval=30
stat_report_interval=60
base_path=/var/www/fastdfs
max_connections=256
sync_wait_msec=200
sync_interval=0
sync_start_time=00:00
sync_end_time=23:59
store_path_count=1
store_path0=/var/www/fastdfs
subdir_count_per_path=256
tracker_server=192.168.1.106:22122
tracker_server=192.168.1.130:22122
log_level=info
run_by_group=
run_by_user=
allow_hosts=*
file_distribute_path_mode=0
file_distribute_rotate_count=100
fsync_after_written_bytes=0
sync_log_buff_interval=10
sync_binlog_buff_interval=60
thread_stack_size=1MB
check_file_duplicate=0
key_namespace=FastDFS
keep_alive=0
http.disabled=false
http.server_port=8888
http.trunk_size=256KB
3,启动192.168.1.106上面的fastdfs
/usr/local/bin/fdfs_trackerd /home/zhangy/fastdfs/tracker.conf
/usr/local/bin/fdfs_storaged /home/zhangy/fastdfs/storage.conf
启动fdfs_storage的时候,192.168.1.106就会从192.168.1.130 同步文件过来,如果没有同步文件的话,说明新增服务器没有配置好。做这一步的时候,192.168.1.130 这台机子fastdfs是一直在运行的。
四,192.168.1.130上面fastdfs配置
1,tracker.conf配置
[root@linux ~]# cat /home/zhangy/fastdfs/tracker.conf |awk '{if($0 !~ /^$/ && $0 !~ /^#/) {print $0}}'
 disabled=false
 bind_addr=
 port=22122
 network_timeout=60
 base_path=/var/www/fastdfs
 max_connections=32
 store_lookup=2
 store_group=group1
 store_server=0
 store_path=0
 download_server=0
 reserved_storage_space = 1GB
 log_level=info
 run_by_group=
 run_by_user=
 allow_hosts=*
 sync_log_buff_interval = 10
 check_active_interval = 120
 thread_stack_size=1MB
 http.disabled=false
 http.server_port=80
2,storage.conf配置
[root@linux ~]# cat /home/zhangy/fastdfs/storage.conf |awk '{if($0 !~ /^$/ && $0 !~ /^#/) {print $0}}'
disabled=false
group_name=group1
bind_addr=
port=23000
network_timeout=60
heart_beat_interval=30
stat_report_interval=60
base_path=/var/www/fastdfs
max_connections=256
sync_wait_msec=200
sync_interval=0
sync_start_time=00:00
sync_end_time=23:59
store_path_count=1
store_path0=/var/www/fastdfs
subdir_count_per_path=256
tracker_server=192.168.1.130:22122
tracker_server=192.168.1.106:22122
log_level=info
run_by_group=
run_by_user=
allow_hosts=*
file_distribute_path_mode=0
file_distribute_rotate_count=100
fsync_after_written_bytes=0
sync_log_buff_interval=10
sync_binlog_buff_interval=60
thread_stack_size=1MB
check_file_duplicate=0
key_namespace=FastDFS
keep_alive=0
http.disabled=false
http.server_port=8888
http.trunk_size=256KB
3,重新启动192.168.1.130上面的fastdfs
pkill fdfs
/usr/local/bin/fdfs_trackerd /home/zhangy/fastdfs/tracker.conf
/usr/local/bin/fdfs_storaged /home/zhangy/fastdfs/storage.conf
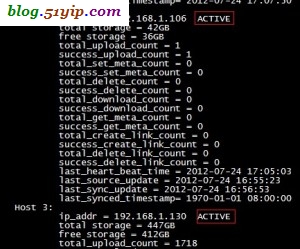
二台机子都启动了fastdfs后,用fdfs_monitor /home/zhangy/fastdfs/storage.conf 来看一下,服务器情况

fastdfs 多服务器
五,192.168.1.131上面php扩展fastdfs配置
[root@linux fastdfs]# cat /home/zhangy/fastdfs/client.conf |awk '{if($0 !~ /^$/ && $0 !~ /^#/) {print $0}}'
 network_timeout=60
 base_path=/var/www/fastdfs
 tracker_server=192.168.1.130:22122
 tracker_server=192.168.1.106:22122
 log_level=info
 http.tracker_server_port=80
改好后重新你的web服务。怎么安装扩展,以及php的fastdfs的api,请参考:FastDFS分布式文件客户端安装,以及fastdfsapi
然后修改fdfs_common.php来增加服务器
$fdfs_tracker_servers[0] = array(
 'ip_addr' => '192.168.1.130',
 'port' => 22122,
 'sock' => -1);
$fdfs_tracker_servers[1] = array(
 'ip_addr' => '192.168.1.106',
 'port' => 22122,
 'sock' => -1);
这样上传后,会在二个服务器都有。

